 pushed
Sending push notifications with Pushed is deadly easy and does not require any coding skills. Let us show you how quick is to setup your Pushed account to send push notifications :)
1. Download Mobile App & Signup
Pushed is available for iOs and Android devices, download and signup to get started. It’s free.Google Play App Store
2. Request Developer Access
In order to send push notifications, you need to request developer access. Don’t worry, it’s an immediate process, all you need is a valid e-mail address. You will receive an e-mail message with a verification link you must confirm. Click Here to Request Developer Access.
This link will open Pushed Developer Panel, in which you will have to Sign In using the same credentials with which you sign up before in the mobile app.
Check your e-mail address now, the one you used to Sign In a moment ago, yep, the same with which you sign up before in the mobile app. You should now receive the following e-mail from us. Click on the Confirm My Email Address button to complete your developer registration.

Great! You now own a Pushed Developer Account, which means you can send push notifications. This account is completely free. Forever. Let us guide you through the process of sending your first notification.
Any issue? Contact Us.
3. Create your app
Apps are the core of Pushed notifications, they are made by the community, alias Developers, Freelance, Companies, Organizations, etc… that means people like you. Apps acts as the containers of the notifications, as every notification belongs to an app.Confusing? Let’s create your first app and you will quickly understand. To create your first app open the Apps section of the Developer Panel and click on Create your first app now. The following modal window will open:

You can always edit your apps name and description, so don’t head with the naming process.
You should now see the App Settings page, where you can edit all the details of your recently created app.

Be aware that you’re recently created app, and all apps by default, is private. That means that it won’t appear in Pushed Discover, the marketplace for Pushed apps, and nobody will be able to subscribe without the subscription link. This is ok for now, as we’re only doing some tests. Keep in mind this for production environments.
4. Subscribe to your recently created app
In order to receive push notifications on your mobile device, you have to subscribe to the recently created app using de QR subscription code. On your app Settings section, click on QR Subscription Code, the QR Subscription Code for your app will appear:
Open Pushed mobile app (you download it in the first step). Tap on the icon (located right at the top). The search view will open, now tap again on the icon (located right at the top), device camera will turn on, now scan the QR code of your app.
You just subscribed to your new app. Now you are ready to send notifications.
5. Send your first notification
Open your Developer Portal and click on New Notification, this following modal window will pop up, insert some notification content and click Send Notification: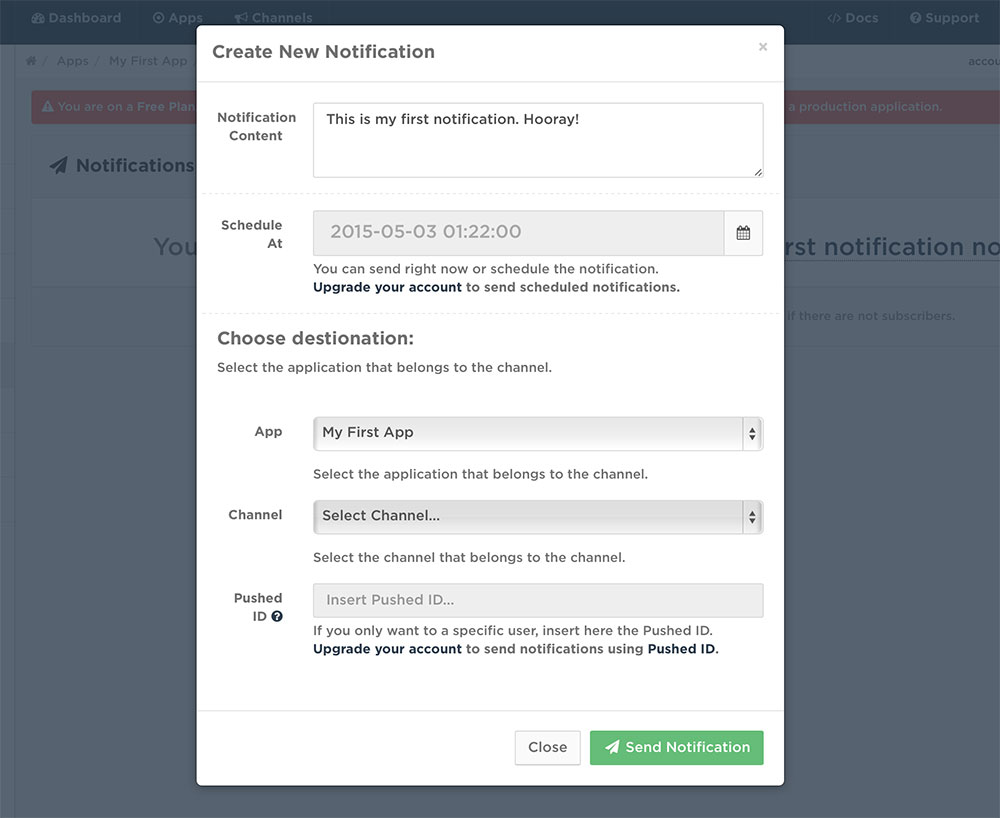
In a few seconds you should receive in your device the notification:

You got it!
Easy right? That’s exactly what we wanted. Now it’s turn to build something amazing and be notified when it happens!